Obsidian is the tool I use to keep digital notes — to jot down thoughts and ideas about life and work, plan and track side projects, write long-form content like this, and more.
In this post, I’ll document how I use Obsidian, how I’ve tweaked it to fit my needs, and how that’s evolved over time.
How I first used Obsidian
When I began using Obsidian, I migrated a bunch of notes from Simplenote. I began imposing structure: I created subdirectories for different kinds of notes, and I turned a part of my vault into a database using Dataview. Over time, I felt like I was spending too much energy thinking about how to organize my vault. I was feeding the perfectionist side of my brain, and along with it a growing dissatisfaction.
Meanwhile, one of my coworkers was using Roam. Roam is based on the premise that thoughts, ideas, and other pieces of information are messy and don’t fit cleanly into a hierarchy of folders. Instead, they’re best represented by a graph which grows and changes shape organically as new information is added. 1 2 Adding another node to the graph should be effortless: each time you load the app, you start with an automatically generated note for the current day. This removes cognitive overhead and allows you to form consistent habits, thereby giving you a sense of “home”. 3
Roam’s unique approach inspired me. While I’ve continued to use Obsidian for practical and philosophical reasons — it’s local-first, cross-platform, extensible, and pleasant to use — I’ve learned that limitations can be an advantage.
How I use Obsidian now
Directories and tags
I use directories to organize my vault, but these days, I try to keep things simple. There are three broad categories of notes that I regularly use:
-
Diary/— Date-based. Most of these entries are conversations between different voices in my head. I’ll let them say what they want to say and move on. I don’t typically go into a lot of detail (good luck to whoever reads this in the future!). -
Log/— Date-based. Ostensibly a “development log”, but really it’s the opposite ofDiary/. These entries tend to be more rounded out, and I tend to revisit them multiple times per day. If I read an interesting article about politics, life, or work, and it inspires me, I’ll write out my thoughts. If I’m reading a book, I’ll keep notes.And if I’m actively working on a project, I’ll “live blog” the experience, noting the problems I’m facing and the solutions as I attempt to solve them. I have found this workflow in particular to be incredibly valuable. For instance, if I put a project on hold and come back to it a year later, I can go back in my notes, see I was headed when I left off, and easily pick up the thread again.
-
Notes/— Non-date-based. Most of my old notes are here, and I have yet to migrate them to a better format. Even so, I still tend to use this category to hold information that I think deserves a bit more structure, I want to keep together in one place, or I feel like would be buried if I left it in a journal entry. Each note tends to center around a concept or theme. For instance, when I do research for big-ticket items (e.g., baby strollers, cars, etc.) or make plans for trips, I’ll add a note here. There are also simple lists of things such as potential baby names, etc.
Beyond this structure, I’ve recently begun using tags to link notes by broader themes. This is a practice I already follow when posting bookmarks to Pinboard, and I already have a list of tags that I frequently use, so tagging notes is pretty easy. For instance, if I’m thinking about AI, I’ll use the tag #artificial-intelligence; if I’m thinking about career goals or dreams, I’ll use #future-work. I also have tags for #philosophy and #physics and #music-analysis.
Core plugins
I use a pretty small set of core plugins:
- Quick Switcher + Files. Most of the time I know what I’m looking for and can jump to it, but sometimes I just want to look at a file tree (and it’s a better interface to perform actions like renames).
- Command Palette. I like this paradigm that’s been integrated into apps over the years. It reminds me of Spotlight on my Mac.
- Page Preview. It’s useful not to have to jump into a note to see what’s inside it.
- Search. For the times where I don’t remember the filename, but I do remember a word or two.
In contrast, here’s what I’ve disabled:
- Backlinks, Outgoing Links, or Graph View. I imagine these would be more useful if I were following Zettelkasten, but I don’t. Maybe some day.
- Canvas. Maybe if I were doing intense research I might need it, but I tend to only use features that I can both on mobile and desktop (see Syncing below), so I haven’t given this a go yet. It’s cool that the JSON representation is opensource, though.
- Bases. I think the Obsidian team has done a great job developing this feature. It certainly looks appealing. But coming from my experience with Dataview, I’m wary of making my vault too complex again.
- Daily Notes. Obsidian only supports creating daily notes in one location, but as mentioned above, I want to have two date-based directories. (I don’t use Templates for a similar reason.) I use QuickAdd instead (see below).
- Outline or Properties View. I don’t usually have documents that are so long that I have trouble scrolling through them. And I don’t need to see properties across all of my notes.
- Sync. I use my own solution (again, see below).
- Web Viewer. I usually have my browser open on either my laptop or phone, and I want to keep all of my open tabs together in the same app.
- Word Count. I don’t really care how long my notes are, and for blog posts like these, I write and rewrite thousands of words and hide the vast majority of them, so a word count doesn’t really help anyway.
Community plugins
I try out new plugins from time to time, but here are the ones that have stuck:
- Commander + QuickAdd. I use the combination of these plugins to add a button to the ribbon that allows me to generate either a diary entry or a log entry using one of two templates I’ve set up.
- Custom File Extensions. This plugin allows me to edit MDX files (more on that later).
- Outliner. Provides some great quality-of-life features for working with lists. On my laptop, I can press
Cmd-Shift-UpandCmd-Shift-Downto move a list item up or down, respectively. On my phone, I have hotkeys to do the same thing. - Smart Typography. This helps me write on my phone because I can type
--to get an em-dash and<-or->to get ← and → respectively. - Vimrc Support. I use Obsidian with Vim keybindings enabled. This plugin extends that by allowing me to see when I’m in insert mode vs. normal mode. It also allows me to add custom settings via a
.vimrcfile (for instance, I mapjtogjandktogkto be able to navigate through wrapped lines, and I useset clipboard=unnamedto use the system clipboard).
Vaults and devices
As I explained in a previous post, the content for the site you see right now — the layout and styles — lives in a separate repo from the site itself. I do this for two reasons:
- If I ever want to change the way my site looks or even rebuild it using a different tech stack, I don’t have to touch the content repo.
- I can keep the Git history between the two isolated.
I load my content repo as a separate vault in Obsidian, so that it’s as easy as possible for me to write blog posts. (More on that later.)
In addition, I use Obsidian on not only my laptop, but also my phone. I’ve found that each device has its own advantages. When I’m out and about, the constraints of time and a small form factor keeps me from overthinking; it pushes me to jot down what I’m thinking before I forget it. Then, when I’m at home, I can sit down and put on my editor hat, picking apart the pieces and putting them back together into a cohesive whole.
Syncing Obsidian between devices
I don’t use Obsidian Sync. It definitely sounds useful, and I’m sure it’s easy to set up. But I like to keep my Obsidian vault in Git so I have ultimate control of not only the current versions of the files in my vault, but also any historical versions as well.
Nor do I use the Obsidian Git plugin. As the README states, it is very unstable on mobile, so that doesn’t work for me.
Instead, I use a custom solution, which I will detail below.
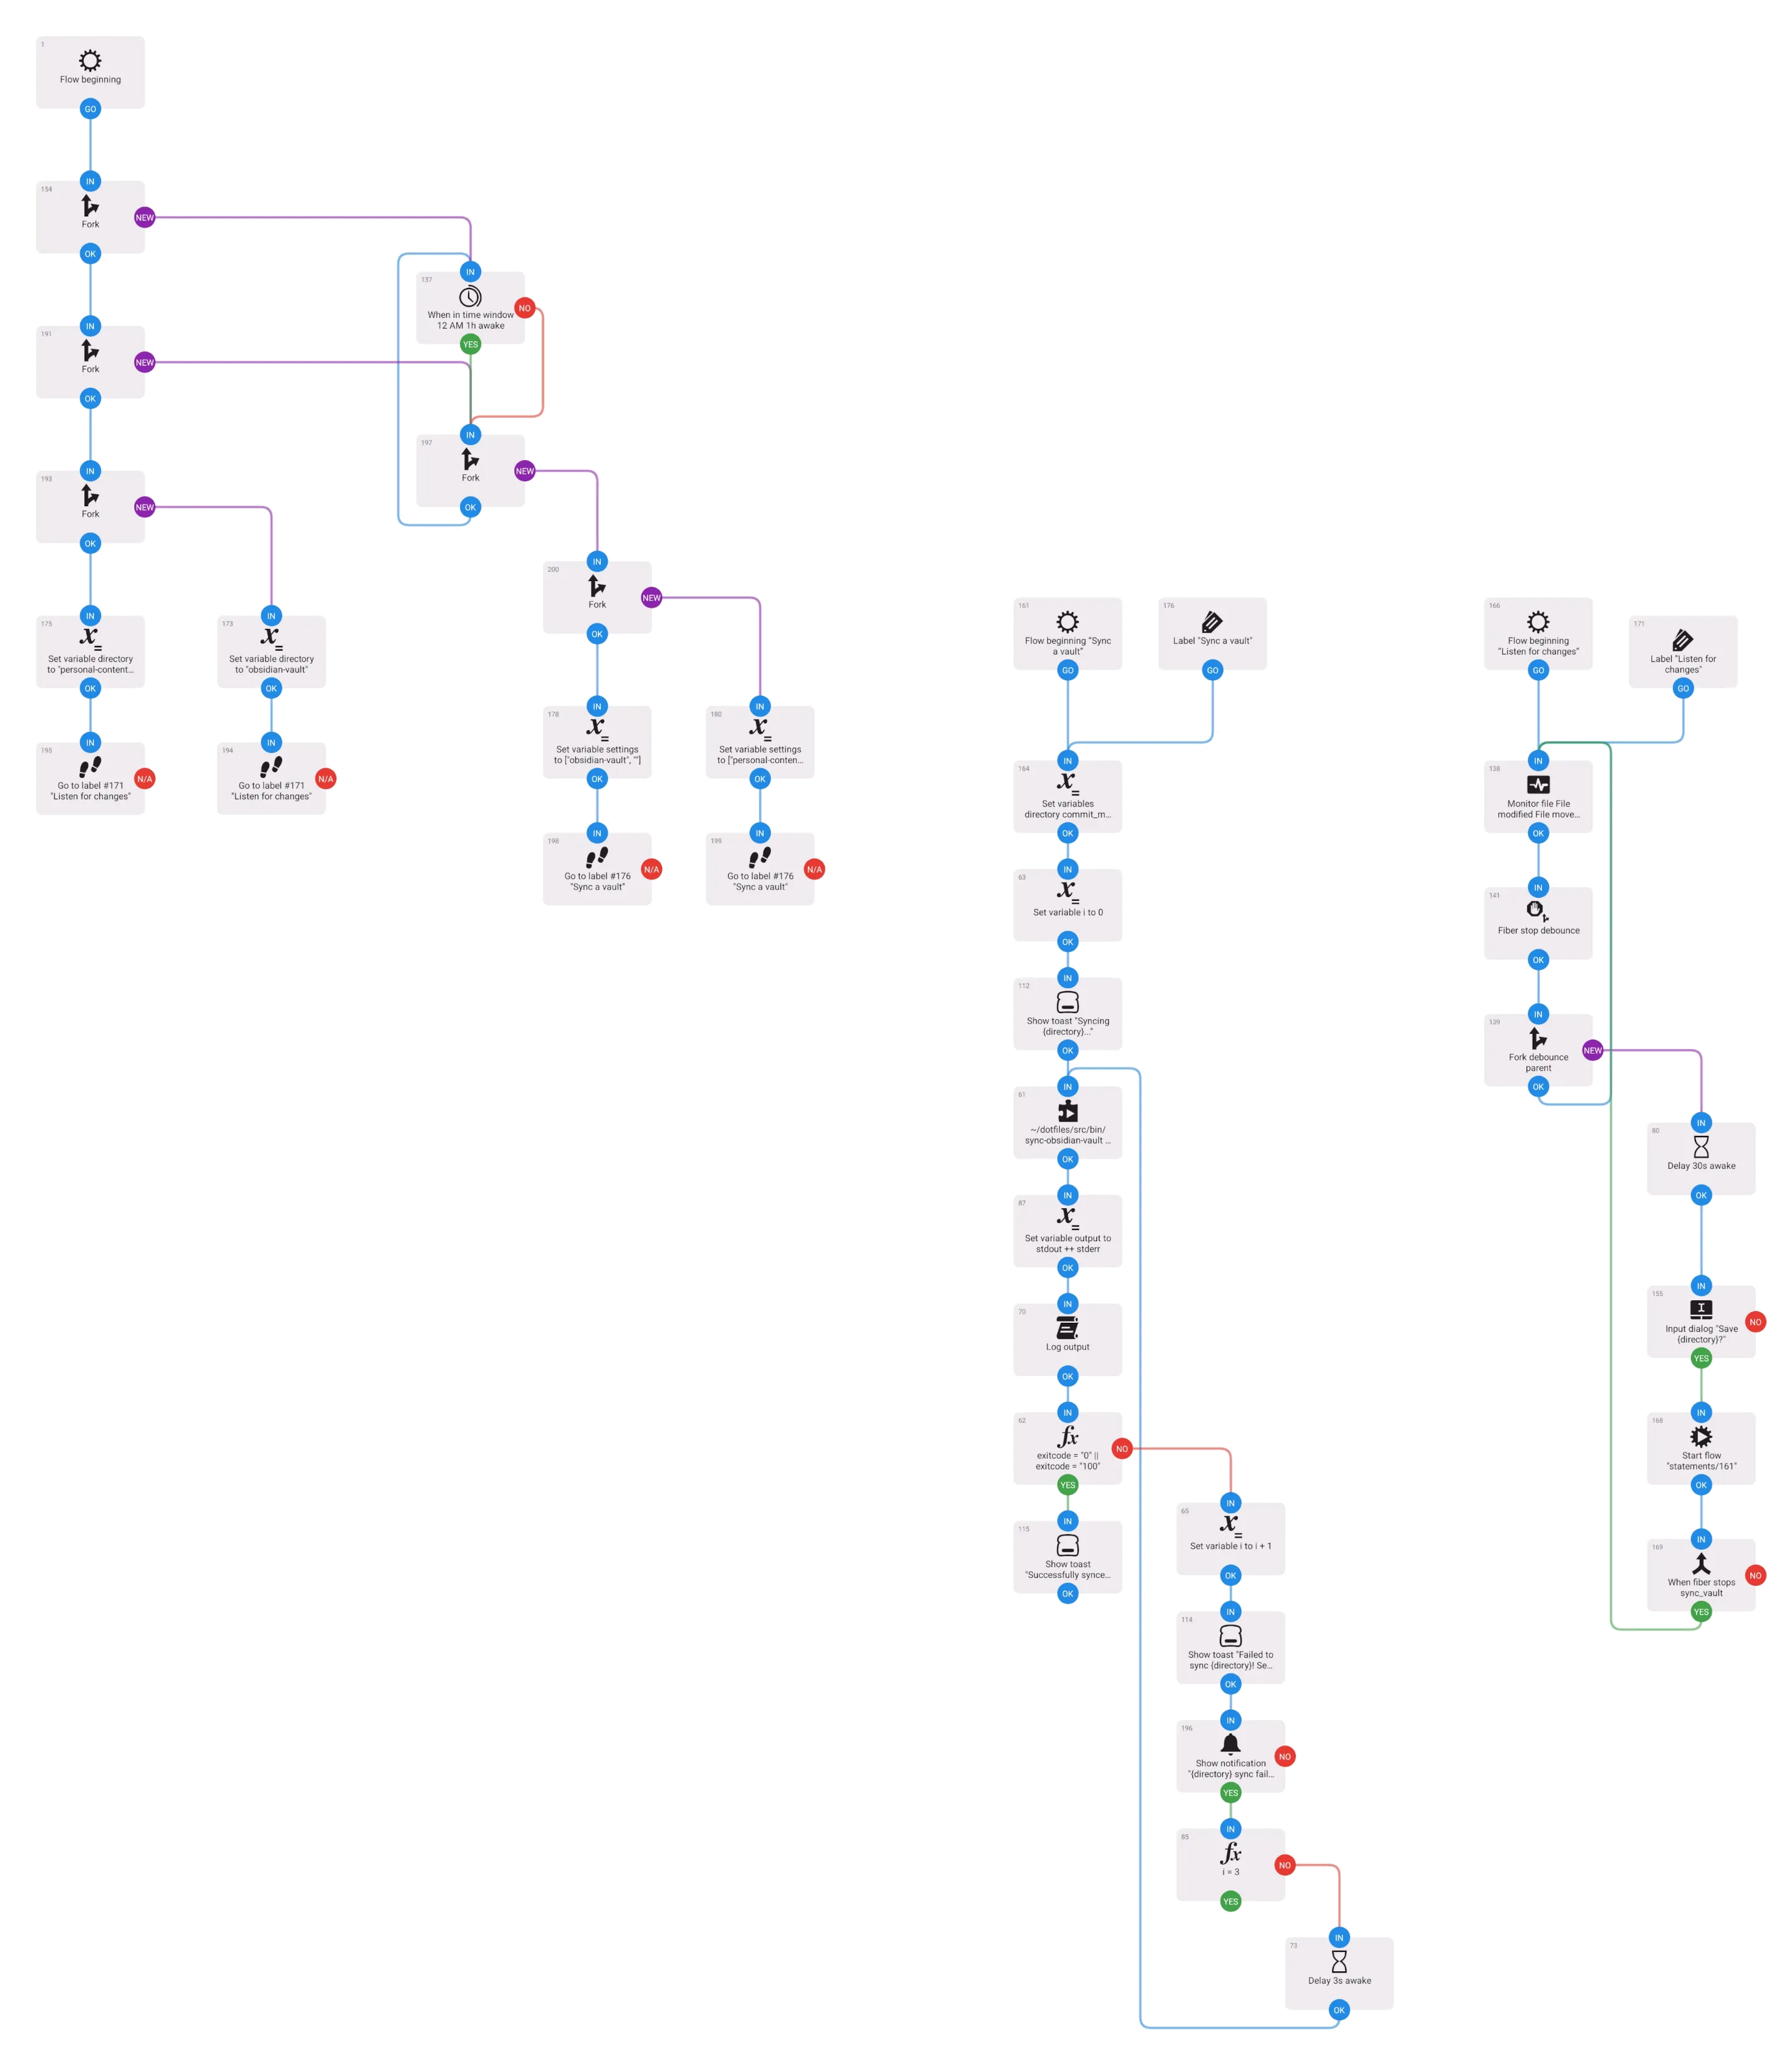
Sync script
The work of syncing changes between the local and remote (GitHub) versions of my vault repo is done by a custom shell script. This script runs the following steps:
- Adds files ending in
.mdand.mdxand files in.obsidianthat have been changed (except for workspace files — see below) - Creates a new commit with the message “Automatic sync” (or, if
--prompt-for-commit-messageis given, asks for a commit message to be entered) - Pulls new commits in, rebasing any pending commits on top of them
- Pushes the
mainbranch
A few notes about this script:
- It uses a lockfile to ensure that only one instance of the script is running at a time.
- If there are no changes to the vault repo, then no commit will get created and nothing will get pushed.
Now, having a sync script is great, but I don’t want to run it manually. To emulate what Obsidian Sync does — and to make things work the same way across my laptop and phone — I have to employ a bit of ✨ magic ✨.
Desktop
On my Mac, I have two kinds of LaunchAgents set up for my vault:
- One LaunchAgent runs a daemon which executes a wrapper around the sync script when any file within the vault is changed. This wrapper performs debouncing, so that no syncing will occur while I’m actively editing a file, but only after I pause for 4 minutes.
- The other LaunchAgent runs the same script every hour (in case file changes don’t trigger the script for some reason).
Both of these LaunchAgents are included in my dotfiles repo, and they get installed when I run bin/manage install.
Mobile
On mobile, I use the Automate app to mimic the same process I have on desktop. (As far as I know, my setup only works on Android; on iOS you could probably use Shortcuts.)
I have one main workflow that combines the two macOS LaunchAgents:
- It monitors the vault repo and automatically runs the sync script when any file is changed. This step is debounced (again, as I’m typing, no syncing will occur, but only after I’ve waited for 2 minutes).
- It also runs the sync script automatically every hour (for the same reason as on desktop, i.e., as a failsafe).
The workflow runs commands via Termux thanks to a plugin block configured with Termux:Tasker. (Automate does come with a “Shell script” block, but it doesn’t work well, as it doesn’t seem to parse commands like a real shell does.)
A second workflow is used to simply run the sync script on demand without monitoring files.
Setting this up on Android required the following steps:
- I downloaded F-Droid and Termux from the Play Store, and I downloaded Termux and Automate from F-Droid.
- I opened Termux and ran
termux-setup-storageto allow access to the SD card. - I used
ghto clone both my vault repo and my content repo inshared/storage. (They need to be here so that Obsidian can see them.) I’ve found thatghworks best over plaingitbecause it handles authentication for private repos very smoothly. - I created a symlink to both repos in the home directory for quicker access.
- I used
ghto clone mydotfilesrepo, also in the home directory. To install them, I first ranpkg install ruby, and then ranbin/manage install.
Preparing the vault repo
There are a couple of ways I’ve configured both repos to work best with syncing.
First, I’ve instructed Git to ignore the Obsidian workspace JSON files (since they tend to collect conflicts easily) as well as trashed files:
.obsidian/workspace.json.obsidian/workspace-mobile.json.trashSecond, I’ve installed Git LFS. This way, if I want to add images or other media (such as audio files from the Audio Recorder plugin), I don’t bloat the repo.
Updating this site via Obsidian
In a previous post, I detailed how I use GitHub workflows to automatically publish in-progress posts using Vercel’s preview build feature. However, one thing that always bugged me is how much effort it took to write a post in the first place.
First, I had to be at my laptop. Then, I had to follow these steps:
- Switch to my terminal
- Navigate to my content repo, open it up in Neovim
- Start writing
- Realize that I want to see a preview
- Open my content repo in VSCode, open up a Markdown preview
- Remember to switch back to terminal and commit when I was at a stopping point
- Finish the post, realize that I want to see what my post really looks like
- Push up a branch
- Make a pull request
- See the post online
In contrast, Obsidian is so painless to use that I can open it anywhere, anytime, and it just works.
It finally dawned on me: Why make things complicated? Why not set things up so that I can publish blog posts straight from Obsidian?
Adding submodules (and then removing them)
At first, I tried using nested Git submodules to embed the repo for my site and my site content into my Obsidian vault. I thought this made sense because then I could see everything in one vault. (I rejected using subtrees or something similar such as git-subrepo because they required keeping some amount of history in the parent repo, and I wanted to keep the history separate.)
In other words, my Obsidian vault repo would have this new structure:
obsidian-vault/ _modules/ elliotwinkler.com/ [submodule] modules/ personal-content--writings/ [sub-submodule] ... Diary/ Log/ Notes/ ...However, I ended up pivoting away from using this strategy for three reasons:
- It was complicated to implement. I needed to update the sync script to recursively descend into submodules, and it took me a few tries to get this right.
- It required babysitting. Because of the nature of submodules, when running the sync script, merge conflicts were a lot more likely to happen, and whenever these occurred, I would be forced to fix them. (Recall that submodules are merely pointers to commits in other repos. If I updated the same blog post on my phone and my laptop, but the two devices were out of sync, they would create two different commits in the superproject. Git doesn’t know what to do with two different pointers, so the merge needed to be completed manually.)
- It made my life more difficult on desktop. A few times, I was writing a post and needed to make changes to my site at the same time. Usually I would have run a development server from the site repo so I could see those changes live, but because I was using submodules, I had to remember to run the server from my Obsidian vault repo instead. And then, because any change in any submodule triggered the sync script, I had to either be willing to accept non-descriptive commit messages like “Automatic sync” or temporarily disable the sync script while I made changes to the site.
Needless to say, submodules did not fulfill the vision I had in mind.
In the end, I decided that the simplest approach was to configure and use my content repo as a separate vault inside of Obsidian.
Adapting the sync process
Adding a second regular vault to Obsidian meant that I now needed to sync it along with my primary vault.
On desktop, I modified the sync script and the LaunchAgents along with their companion scripts so that they took a --vault-directory option. In addition, on desktop, I ran a whole other pair of LaunchAgents for the second vault, and on mobile, I had to modify the Automate workflow so that it monitored not only my primary vault repo, but also my content repo.
This is what my Automate workflow looks like now:
Updating the deployment process
Adding the content repo to Obsidian and syncing it just like a “regular” vault meant that there would be a lot of commits pushed straight to main. This created a bit of a problem because I’d previously configured my content repo to follow more of a conventional Git workflow: pushes to main deployed production, whereas pushes to a pull request deployed a preview of an in-draft post. But now that wasn’t going to work anymore.
So instead, pushing to main now deploys a preview build only. If I want to deploy to production, I have to go on my laptop, find my site repo on GitHub, and trigger a workflow manually. There is probably a way I can speed this up, but I don’t publish blog posts that often, so I think this is an acceptable tradeoff.
Reconfiguring Obsidian
By default, Obsidian only lets you see and work with .md files; if there are any other files present in your vault, it ignores them.
Since blog posts on my site are MDX files, however, I need to make them visible. There doesn’t seem to be an official way to do this, but I found the Custom File Extensions plugin. It’s a bit overengineered for my liking, but it does the job.
Updating the site repo
Obsidian implements a superset of CommonMark, aptly called Obsidian Flavored Markdown. In order for posts to appear the same way they do on Obsidian, I’ve updated my site to support the following two features:
- Callouts. These are very similar to GitHub’s alerts feature, except that callout types are allowed to be lowercase, and there are a lot more types supported. 4 Thankfully, someone created
rehype-callouts, and this works very well. - Comments. These are designated using “ instead of
<!--...-->. I created a custom Remark plugin to handle this.
The end
That’s how I use Obsidian. There’s more to improve upon, of course, but I’m happy with it so far.
Footnotes
-
“A brief rant on note-taking apps and the structure of thought”, from one of the co-creators of Roam. ↩
-
There’s a whole discussion about adding callouts to CommonMark, but no decision has been made yet. ↩